Getting started with Selenium
Chapters
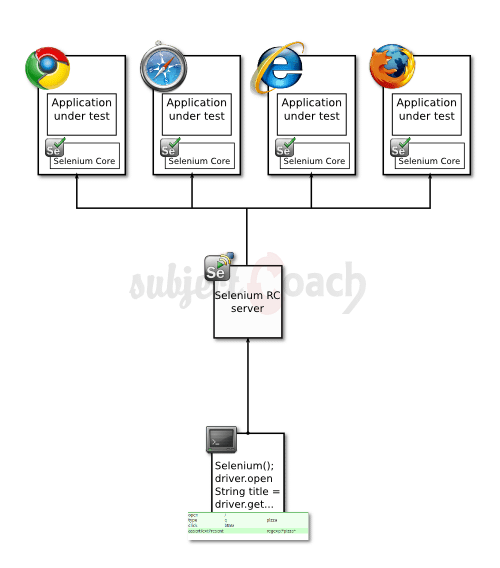
Selenium Remote Control
Selenium RC is a popular tool for writing automated tests of web applications. We can develop automated tests in the programming language of your choice such as c#, java, python, php, Perl and ruby as well as running those tests on different combination of browsers such as Chrome, Firefox or IE.
Selenium RC is a client/server based application that allows you to control web browsers using the following components
- Selenium Server: Uses Selenium core and browser’s built-in JavaScript interpreter to process selenese commands (such as click, type) and report back results.
- Selenium Client Libraries: Are the API’s for the programming languages to communicate with Selenium server.
Scripting of RC:
Now let us discuss a sample script by using Selenium Remote Control.
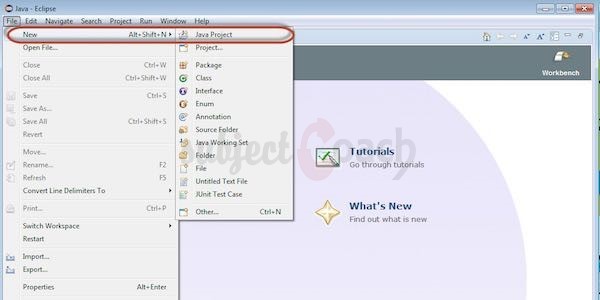
Step 1: Start Selenium Remote Control and launch Eclipse and create a "New Project" as shown.
Step 2: Give the project name, click 'Next' button and then click 'Finish'.
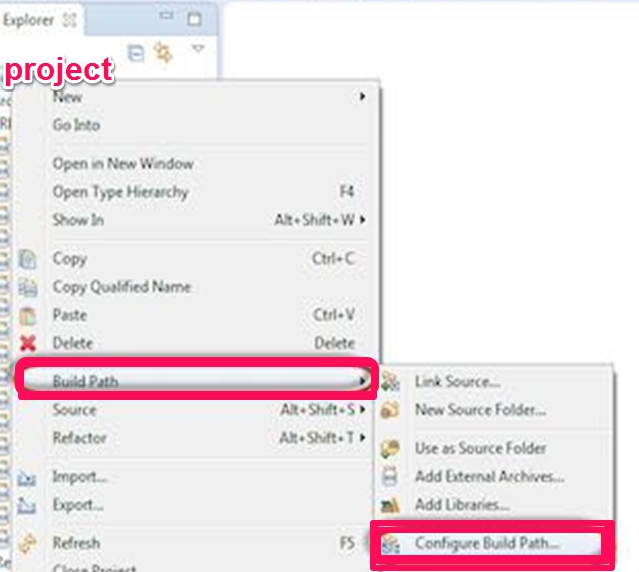
Step 3: Right click 'project' container and select 'Configure Build Path'.
Step 4: Now navigate to 'Libraries' tab and click 'Add External JARs' then Choose the Selenium RC jar file that we have downloaded.

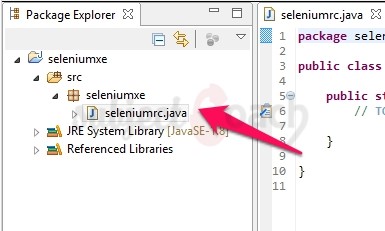
Step 5: To create a new class: Right click on 'src' folder and select 'New' click 'class'.

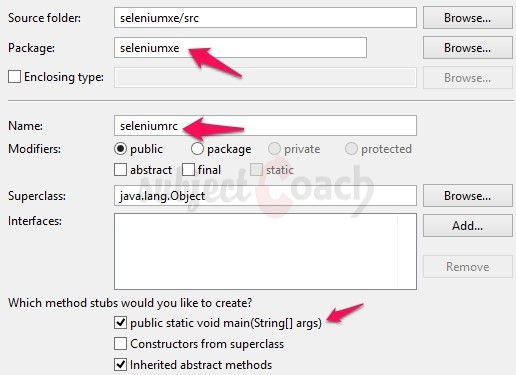
Step 6: Enter the class name "seleniumrc" and check 'public static void main' as shown below
Step 7: The class is created under the project folder as shown below.
Step 8: Start coding. The following code has comments are added in it for the readers reference.
Follow the URL: http://www.xe.com/ will perform a Percent calculation using 'Percent Calculator' which is come under the 'Math Calculators'.
package seleniumxe;

import com.thoughtworks.selenium.DefaultSelenium;
import com.thoughtworks.selenium.Selenium;

public class rcdemo {
   public static void main(String[] args) throws InterruptedException {

      // the RC Server Instantiation
      Selenium selenium = new DefaultSelenium("localhost", 4444 , "firefox", "http://www.xe.com/currencyconverter");
      selenium.start();   // Start
      selenium.open("/");  // Open the URL
      selenium.windowMaximize();

      // verify if the result is USD in hidden field
      String result = selenium.getValue("//input[@id='from_var']");

      if (result.equals("USD")){
         System.out.println("Test Passed");
      }
      else{
         System.out.println("Test Failed");
      }
   }
}
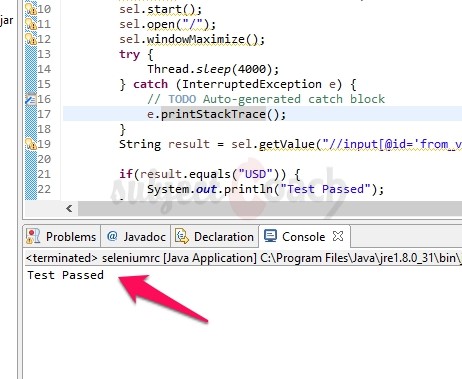
Step 9: To execute click on 'Run'. This will verify if hidden input field have USD as value or not. This test will print "Test passed" or "Test Failed" depending on if above condition is true or false.

Result
In next chapter we will learn Selenese Commands
Description
This tutorial will get you started with Selenium. This tutorial is subdivided into 11 chapters.
- Overview
- IDE
- Environment Setup
- Remote Control
- Selenese Commands
- Webdriver
- Locators
- User Interactions
- Test design techniques
- TestNG
- Grid
* freelancer contributed
Environment
A PC capable of running selenium
Prerequisites
A basic idea of what Software Testing is.
Audience
People who wish to get started with Selenium
Learning Objectives
You will learn ins and outs of Selenium which includes downloading, installing and using Selenium.
Author: Subject Coach
Added on: 10th Feb 2015
You must be logged in as Student to ask a Question.
None just yet!