Getting started with Selenium
Chapters
Getting started with TestNG
What is TestNG?
TestNG is a testing framework which is used for different range of testing. Eg. Unit Testing, Integration Testing etc.
It is a framework that overcomes the limitations of another testing framework called JUnit. The "NG" stands for "Next Generation".
TestNG Features are:
- Support for annotations
- Support for parameterization
- In Advance execution methodology need not to create test suites
- Support for Data Driven Testing using Dataproviders
- It Enables user to group execution priorities for the test methods
- Supports threat safe environment when executing multiple threads
- Supports integration with many tools and plug-ins like Ant, Maven etc. and Integrated Development Environment (Eclipse).
Installing TestNG for Eclipse:
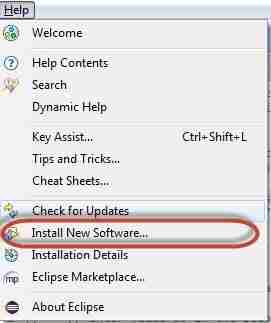
Step 1: To Install testNG click Help on Eclipse menu bar and Select the option "Install New Software...”.
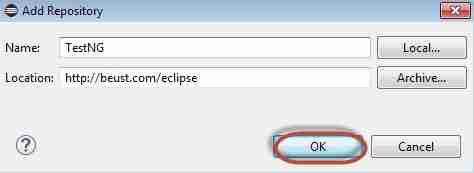
Step 2: To start installation, click the Add button
Step 3: Now enter the name as TestNG and in the "Location", type the URL: http://beust.com/eclipse, click ok button:
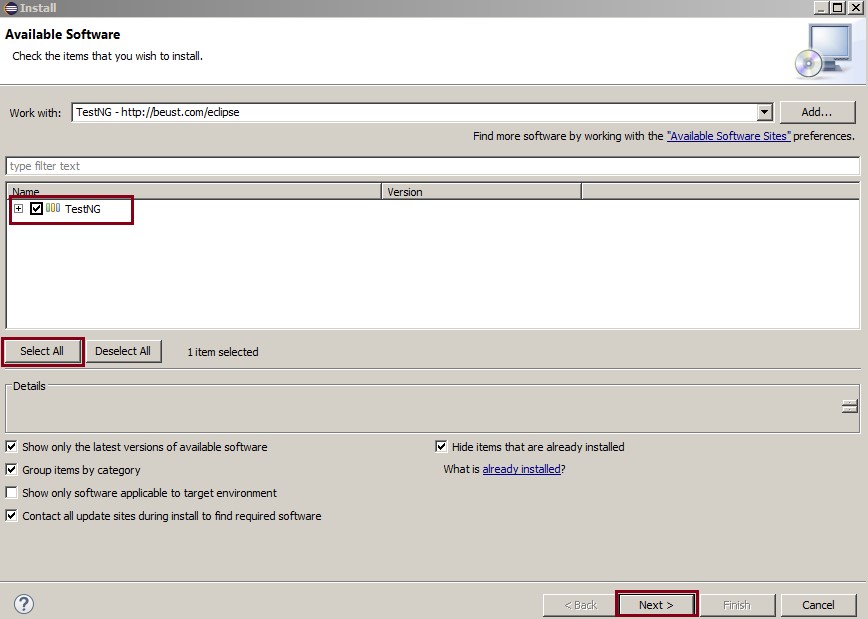
Step 4: Click “Select All”, then check the “TestNG” then click “Next”:
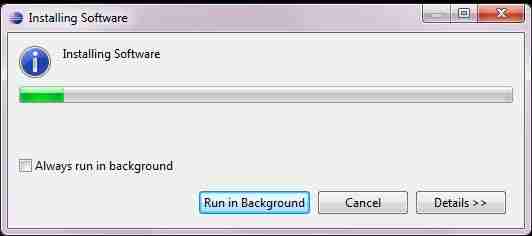
Step 5: Click 'Next' to begins the installation process:
Step 6: Here click the radio button "I accept the terms of the license agreement" and then click Finish button.
Step 7: Installation process will start now,Wait for the installation to finish
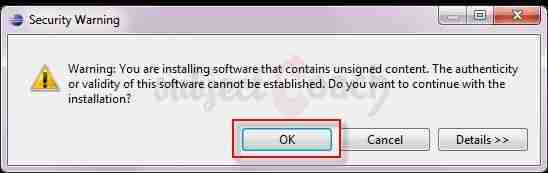
Step 8: We will get Security warning dialog box, click OK.
Step 8: Software Updates dialog box will pop-up to restart eclipse, click “Yes”.
Annotations in TestNG:
Annotations are those things in TestNG which guides it for what to do next or which method should be executed next.
Annotations benefits:
- Enbles us to pass additional parameters to annotations.
- Annotations are in-built, so the compiler will flag any mistakes immediately.
Before that I would like you to give a small idea on Annotations hierarchy
<suite><test><classes><method><test></method></classes></test></suite>
Following is the list of the most useful annotations in TestNG:
- @Test: The annotation which notifies the system that annotated method as @Test is a test method.
- @BeforeSuite: The method annotated as @BeforeSuite should be executed before executing the tests in the entire suite.
- @AfterSuite: The method annotated as @AfterSuite should be executed after executing the tests in the entire suite.
- @AfterTest: The method annotated as @AfterTest should be executed after executing any test method within the same test class.
- @BeforeClass: The method annotated as @BeforeClass should be executed before executing the first test method within the same test class.
- @AfterClass: The method annotated as @AfterClass should be executed after executing the last test method within the same test class.
- @BeforeMethod: The method annotated as @BeforeMethod should be executed before executing any and every test method within the same test class.
- @AfterMethod: The method annotated as @AfterMethod should be executed after executing any and every test method within the same test class.
- @BeforeGroups: The method annotated as @BeforeGroups is a configuration method that enlists a group and that should be executed before executing the first test method of the group.
- @AfterGroups: The method annotated as @AfterGroups is a configuration method that enlists a group and that should be executed after executing the last test method of the group.
TestNG-Eclipse Setup:
Step 1: In eclipse go to menu bar click “file” then create a 'New Java Project'.
Step 2: The project name should be entered here before you click 'Next'. Click Next.
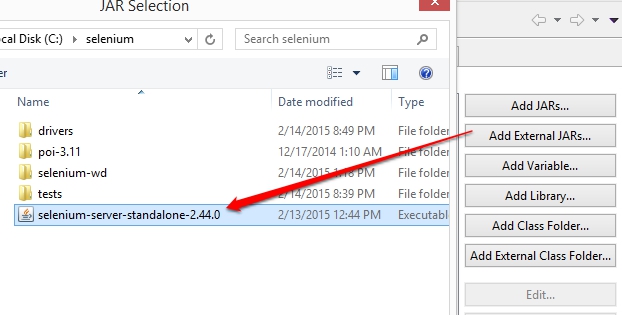
Step 3: To add Add the Selenium Remote Control Server JAR file,Go to "Libraries" Tab and clicking on "Add External JAR's" and add selenium server standalone jar file to library
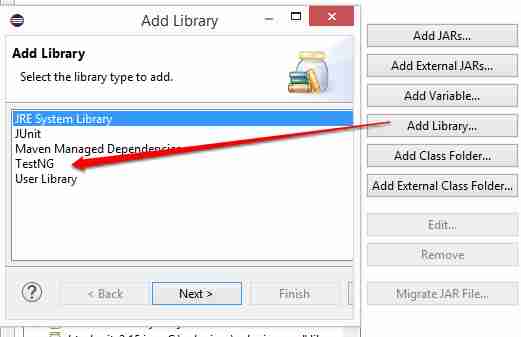
Step 4: Add TestNG Library to project as shown below
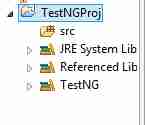
Step 5: Make sure the project structure looks like this
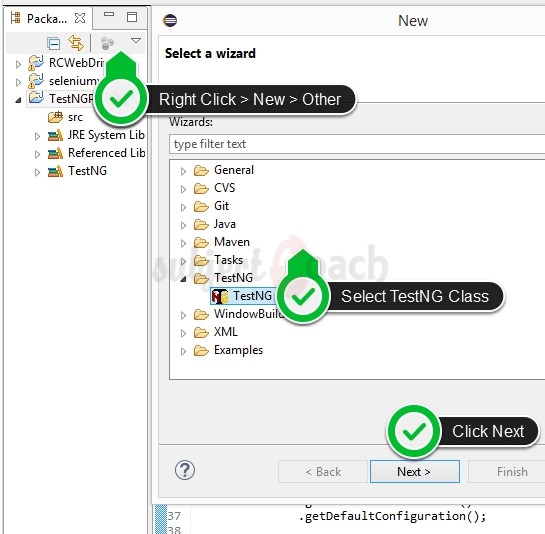
Creating a New TestNG Test File:
To create a new TestNG file follow below steps:
Step 1: Right-click on "src" folder, then choose New Select “Other…”:
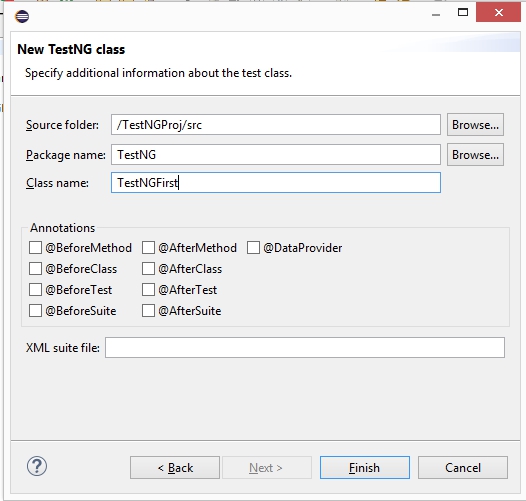
Step 3: Enter the appropriate input boxes and click Finish. Here we have named Java file as "TestNGFirst".
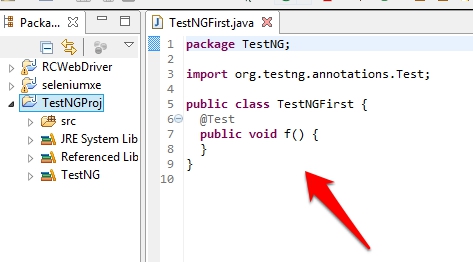
The created class will be displayed as shown below.
First Test in TestNG:
Here we will use the demo application, www.calculator.net, and perform percent calculator.
The program execution is takes place on the basis of annotations. Hence there is no need of main() method in test scripts using TestNG.
Example from previous chapter:
Here we getting default amount value from xe.com currency converter in all modern browsers simultaneously
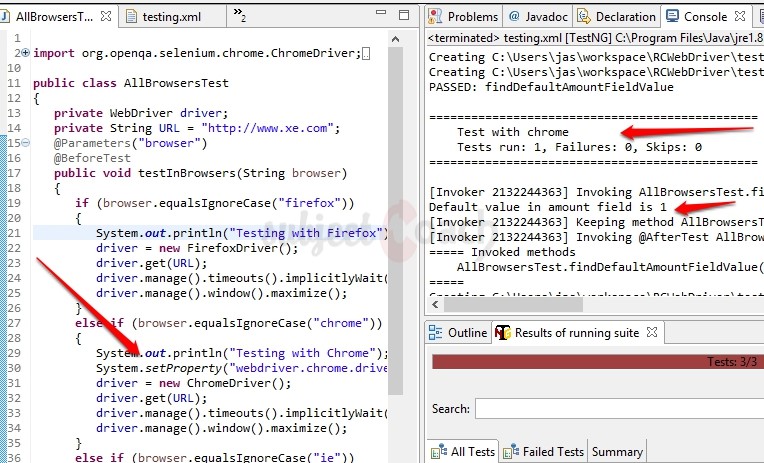
package TestNG;
import org.openqa.selenium.chrome.ChromeDriver;
import org.openqa.selenium.firefox.FirefoxDriver;
import org.openqa.selenium.ie.InternetExplorerDriver;
import java.util.concurrent.TimeUnit;
import org.openqa.selenium.*;
import org.testng.annotations.*;

public class AllBrowsersTest
{
   private WebDriver driver;
   private String URL = "http://www.xe.com";
   @Parameters("browser")
   @BeforeTest
   public void testInBrowsers(String browser)
   {
      if (browser.equalsIgnoreCase("firefox"))
      {
         System.out.println("Testing with Firefox");
         driver = new FirefoxDriver();
         driver.get(URL);
         driver.manage().timeouts().implicitlyWait(10, TimeUnit.SECONDS);
         driver.manage().window().maximize();
      }
      else if (browser.equalsIgnoreCase("chrome"))
      {
         System.out.println("Testing with Chrome");
         System.setProperty("webdriver.chrome.driver", "c:\\selenium\\drivers\\chromedriver.exe");
         driver = new ChromeDriver();
         driver.get(URL);
         driver.manage().timeouts().implicitlyWait(10, TimeUnit.SECONDS);
         driver.manage().window().maximize();
      }
      else if (browser.equalsIgnoreCase("ie"))
      {
         System.out.println("Testing with Internet Explorer");
         System.setProperty("webdriver.ie.driver", "c:\\selenium\\drivers\\IEDriverServer.exe");
         driver = new InternetExplorerDriver();
         driver.get(URL);
         driver.manage().timeouts().implicitlyWait(10, TimeUnit.SECONDS);
         driver.manage().window().maximize();
      }
      else
      {
         throw new IllegalArgumentException("The Browser Type is Undefined");
      }
   }
   @Test
   public void findDefaultAmountFieldValue()
   {
	   WebElement element = driver.findElement(By.xpath(".//*[@id='amount']"));
       String result =  element.getAttribute("value");
	      if(result.equals("1")){
	    	  System.out.println("Default value in amount field is 1");
       }
	      else {
	    	  System.out.println(" Default value in amount field is not 1");
       }
   }
   @AfterTest
   public void closeBrowser()
   {
      driver.close();
   }
}
To define the order of the our tests, we will have to create an XML (testing.xml) file listing the test methods we would like to run. Make sure that the test methods are annotated with @Test, or else the TestNG engine will not invoke them at all.
To run parallel need to mention parallel="tests" as shown.
Here is such XML that we created for our tests
<suite name="XE default value test" verbose="10" parallel="tests"><test name="Test with firefox" preserve-order="true"><parameter name="browser" value="firefox" /><classes><class name="AllBrowsersTest" /></classes></test><test name="Test with chrome" preserve-order="true"><parameter name="browser" value="chrome" /><classes><class name="AllBrowsersTest" /></classes></test><test name="Test with internet explorer" preserve-order="true"><parameter name="browser" value="ie" /><classes><class name="AllBrowsersTest" /></classes></test></suite>
How to execute our test script?
Execute as TestNG Suite as shown below. Please note: you must install TestNG plugin for eclipse IDE before you can run
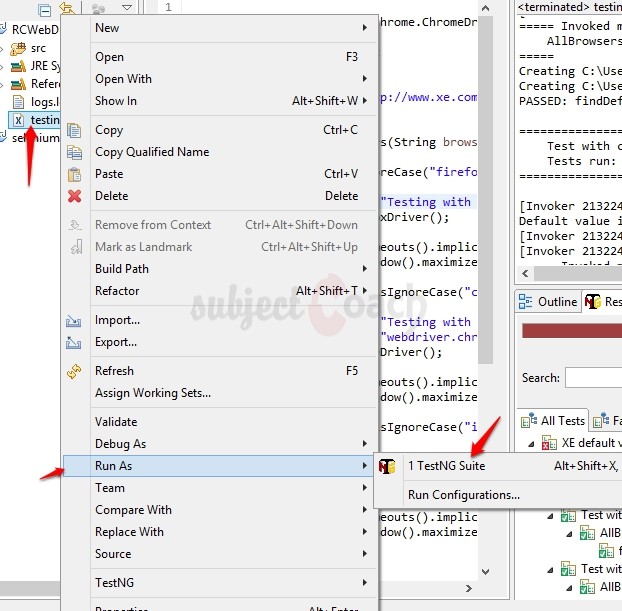
The browsers (firefox, chrome, internet explorer) will be launched simultaneously and the result will be printed in the console window.
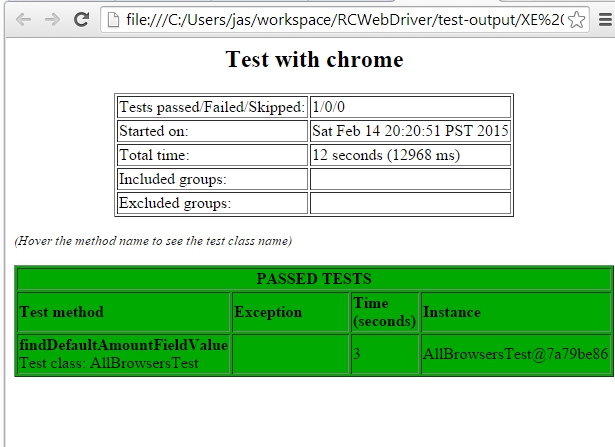
Results:
TestNG also outputs HTML and XML files, which you are able to open in a browser to analyze your results.
In next chapter we will will learn about Selenium Grid
Description
This tutorial will get you started with Selenium. This tutorial is subdivided into 11 chapters.
- Overview
- IDE
- Environment Setup
- Remote Control
- Selenese Commands
- Webdriver
- Locators
- User Interactions
- Test design techniques
- TestNG
- Grid
* freelancer contributed
Environment
A PC capable of running selenium
Prerequisites
A basic idea of what Software Testing is.
Audience
People who wish to get started with Selenium
Learning Objectives
You will learn ins and outs of Selenium which includes downloading, installing and using Selenium.
Author: Subject Coach
Added on: 10th Feb 2015
You must be logged in as Student to ask a Question.
None just yet!