Year 10+ Constructions
Chapters
Constructing the Perpendicular to a Line Segment at a Point NOT on the Line Segment
Constructing the Perpendicular to a Line Segment at a Point NOT on the Line Segment
Compass and straight edge constructions are of interest to mathematicians, not only in the field of geometry, but also in algebra. For thousands of years, beginning with the Ancient Babylonians, mathematicians were interested in the problem of "trisecting an angle" (cutting an arbitrary angle into three equal parts) using a straight edge and compass. It turns out that this is only possible for some angles, but no-one managed to prove this until the late 19th Century.
However, it is possible to construct a perpendicular to a line segment at a point that is not on the line segment using only a pair of compasses and a straight edge.
For this construction, you will need a straight edge (ruler - but you won't be measuring anything), pair of compasses, a pencil and paper. I have drawn the pictures using the robocompass app. It's fun to play with, and you can use it to do all sorts of geometric constructions. There's a little bit of coding to learn, but a list of instructions is provided. Once you've written your little program, you can settle back in the lounge, dim the lights and watch the construction. Be warned that, when you are using it to draw arcs, the robocompass compass point may appear to be a little away from the centre, but the drawing is actually accurate.
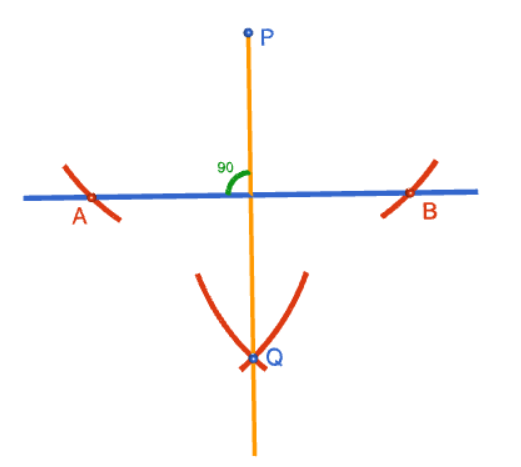
The Construction

Step 1: Start out by drawing the line segment and a point \(P\) that is not on the line segment. Please don't be like Sam! Use a ruler to draw this.
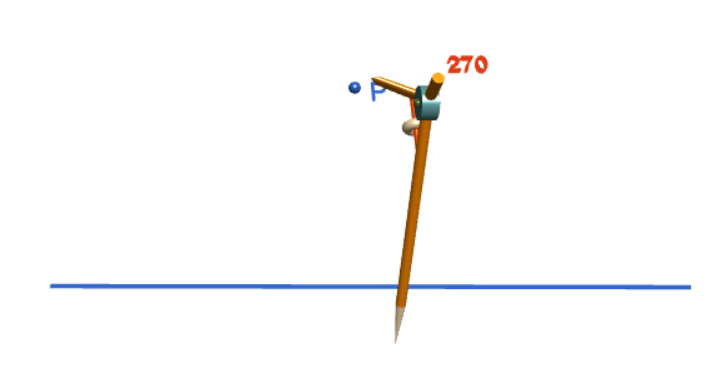
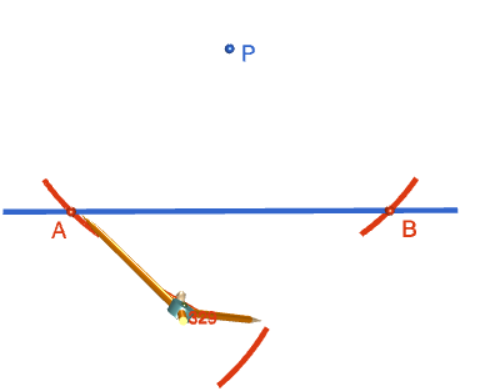
Step 2: Place the tip of your pair of compasses on point \(P\), and open them out to a width that is about \(1.5\) times the distance from \(P\) to the line. You are going to draw four arcs of this radius, so make sure you keep it fixed. Draw an arc to the right of your point, cutting through your line segment. The picture shows the tip of the compass a little away from point \(P\). This is just a problem with the animation. The arc is actually centred at point \(P\), so make sure your compass tip is exactly on point \(P\).
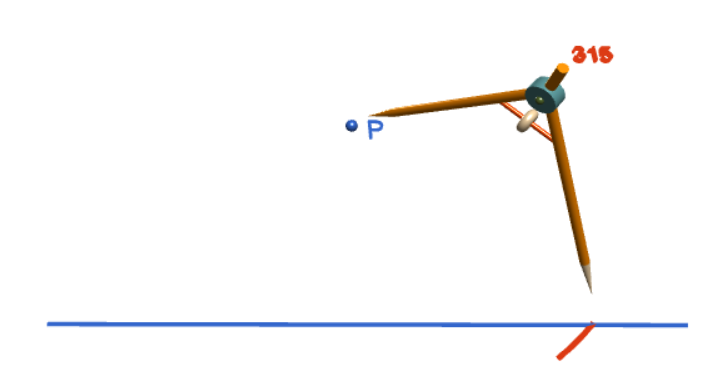
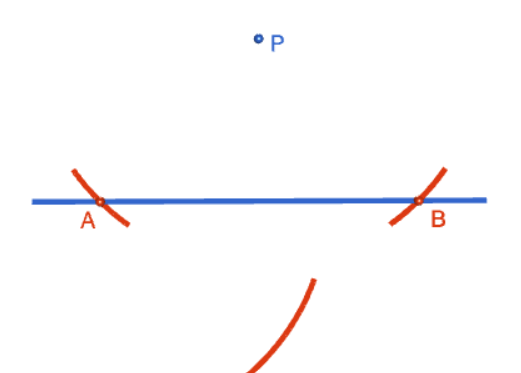
Step 3: Keeping your compasses at the same radius as in the preceding step, draw another arc, crossing the line segment, but this time to the left of point \(P\). The picture shows the tip of the compass a little away from point \(P\). This is just a problem with the animation. The arc is actually centred at point \(P\), so make sure your compass tip is exactly on point \(P\). Mark the points where the arcs intersect the line segment \(A\) and \(B\). The picture on the right shows the completed arcs.
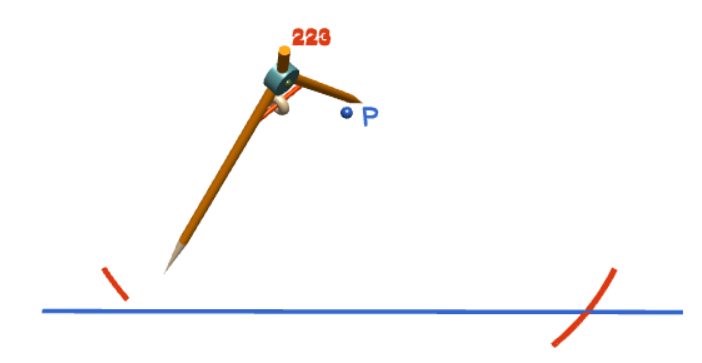
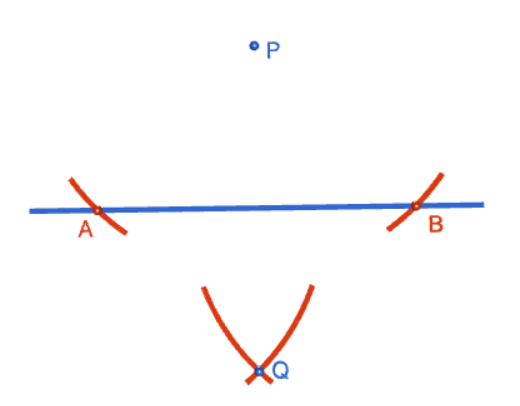
Step 4: Using the same radius as in steps 2 and 3, stick the tip of your compass in at point \(A\) and draw an arc below the line, and directly below the point \(P\). The picture shows the tip of the compass a little away from point \(A\) (and the other end of the compass away from the place where the arc is drawn). This is just a problem with the animation. The arc is actually centred at point \(A\), so make sure your compass tip is exactly on point \(A\). The picture on the right shows the completed arc.

Step 5: Using the same radius as in step 4, stick the tip of your compasses in at point \(B\) and draw an arc below the line and directly below the point \(P\), intersecting the arc from step 4. The picture shows the tip of the compass a little away from point \(B\) (and the other end of the compass away from the place where the arc is drawn). This is just a problem with the animation. The arc is actually centred at point \(B\), so make sure your compass tip is exactly on point \(B\). The picture on the right shows the completed arc.
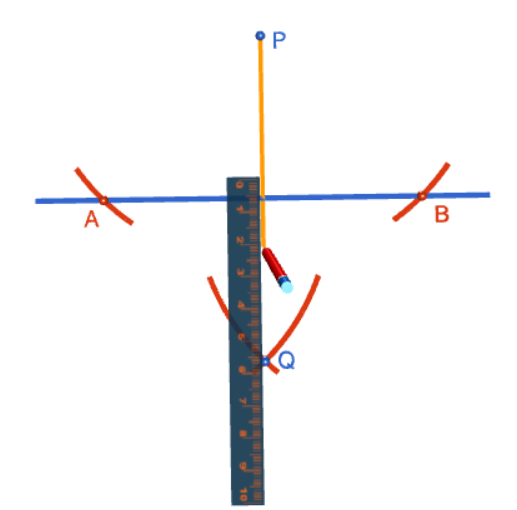
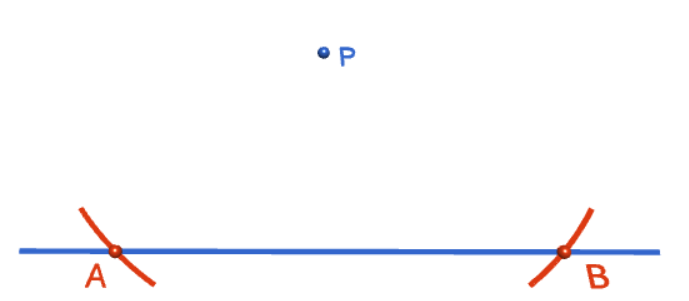
Step 6: Use a straight edge to draw a line from the point \(P\) down to the point \(Q\) where the two arcs cross, as shown in the picture on the left. This will be your perpendicular. The picture on the right shows the finished construction. It doesn't look "perpendicular", but that's just because of the angle of the drawing. You can check the angle with your protractor or a set square. Have fun doing the construction!
Description
This tutorial will expose you to Rulers and how to use them. We will also have a close look as set square and compass constructions. Your feedback is important to us, if you like any other topic covered under this tutorial, please do let us know.
Audience
Year 10 or higher
Learning Objectives
Ruler and compass constructions and more
Author: Subject Coach
Added on: 27th Sep 2018
You must be logged in as Student to ask a Question.
None just yet!