Working with TestNG - Starters Guide
Chapters
Test Suite
A test suite is a group of test cases intended set of behaviors of software program. TestNG suite can contain more than one test and is defined by the <suite> tag. User can run the test suite by using testing.xml file. It is explained with below example. <suite> is the root tag of testng.xml. It describes test suite which in turn consists of several <test> sections.
The attributes of <suite> accepts.
Name:The name of this suite and mandatory.
Parallel:This attribute is used to run different threads as a suite
Annotations: The annotations are used in tests.
Verbose: This attribute used to specify the level or verbosity for run.
Thread-Count: The number of threads to use and if parallel mode is enabled if not ignored.
Create a Class:
Create a java class named as StudentMessage.java
package testNG;
public class StudentMessage {
private static String marks;
//Constructor
public StudentMessage(String marks) {
StudentMessage.marks = marks;
}
//Marks
public static String printMarks() {
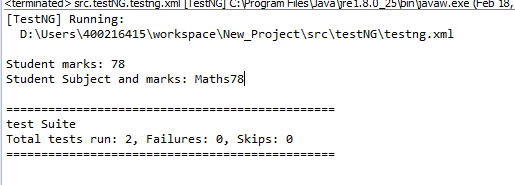
System.out.println("Student marks: " + marks);
returnmarks;
}
//Subject
public static String printSubject() {
marks = "Maths" + marks;
System.out.println("Student Subject and marks: " + marks);
returnmarks;
}
}
Create Test Case Classes:
Create a java class named as TestCase1.java
package testNG;

import org.testng.Assert;
import org.testng.annotations.Test;

public class TestCase1 {
	String marks = "78";
	StudentMessage stud = newStudentMessage(marks);

	@Test
	public void method1() {
		Assert.assertEquals(marks, StudentMessage.printMarks());
	}
}
Create a java class named as TestCase2.java
package testNG;

import org.testng.Assert;
import org.testng.annotations.Test;

public class TestCase2 {
	String marks = "78";
	StudentMessage stud = newStudentMessage(marks);

	@Test
	public void method1() {
		marks = "Maths" + marks;
		Assert.assertEquals(marks, StudentMessage.printSubject());
	}
}
Now, prepare the testng.xml to run prepared classes, "testSuite" which includes test1 and test2.
<?xml version="1.0" encoding="UTF-8"?>
<suite name="test Suite">
<test name="test1">
   <classes>
       <class name="testNG.TestCase1"/>
   </classes>
</test>
<test name="test2">
   <classes>
       <class name="testNG.TestCase2"/>
    </classes>
</test>
</suite>
Run the testing.xml file by clicking on run button in eclipse.
The Output will be something like as shown below
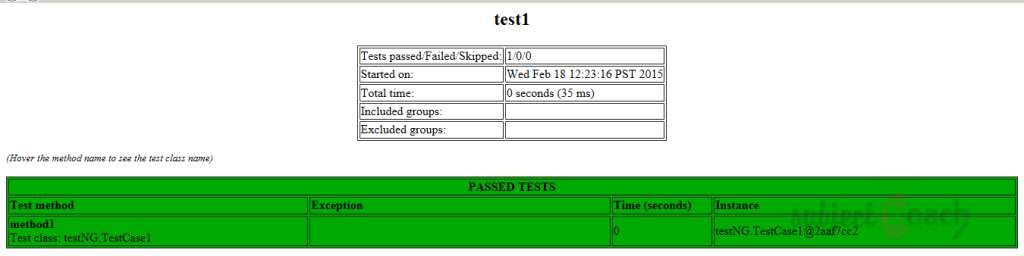
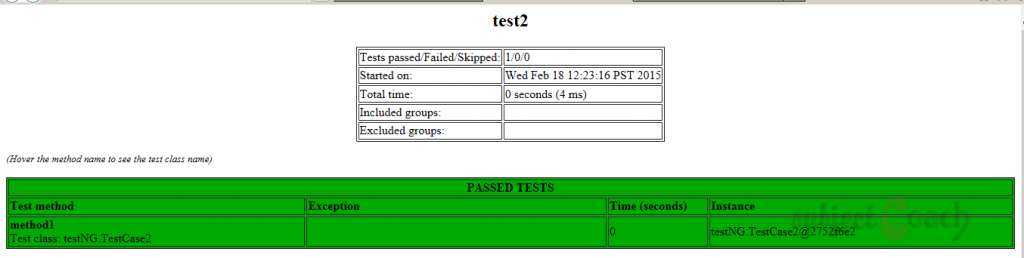
User can also check the test-output folder. Under the test Suitefolder, we able to see two html files created, test1.html and test2.html:
Description
This tutorial is focused on getting you started on TestNG, the testing framework inspired from JUnit and NUnit. Here is a quick table of contents
- What is TestNG?
- Environment Set-up
- Writing Tests
- Basic Annotations
- Execution Procedure
- Executing Tests
- Suite Test
- Ignore Test
- Group Test
- Exception Test
- Dependency Test
- Parametrized Test
- JUnit Tests
- Test Reports
- Running tests without Eclipse
- Plugin with ANT
Environment
A computer capable of running Java. IntelliJ Community IDE is also required for this course.
Prerequisites
Good knowledge of Java programming language and eclipse is essential.
Audience
Students looking to get started with TestNG
Learning Objectives
This tutorial will get you started with TestNG.
Author: Subject Coach
Added on: 12th Mar 2015
You must be logged in as Student to ask a Question.
None just yet!