A complete Idiot's guide to get started with WooCommerce
Chapters
Setting up WooCommerce
In previous chapter you learned how to install WooCommerce plugin. This chapter will take you in depth on how to set it up.
General WooCommerce Settings
Goto WooCommerce > Settings from your Admin panel navigation and you will see WooCommerce settings page
Here is how it looks
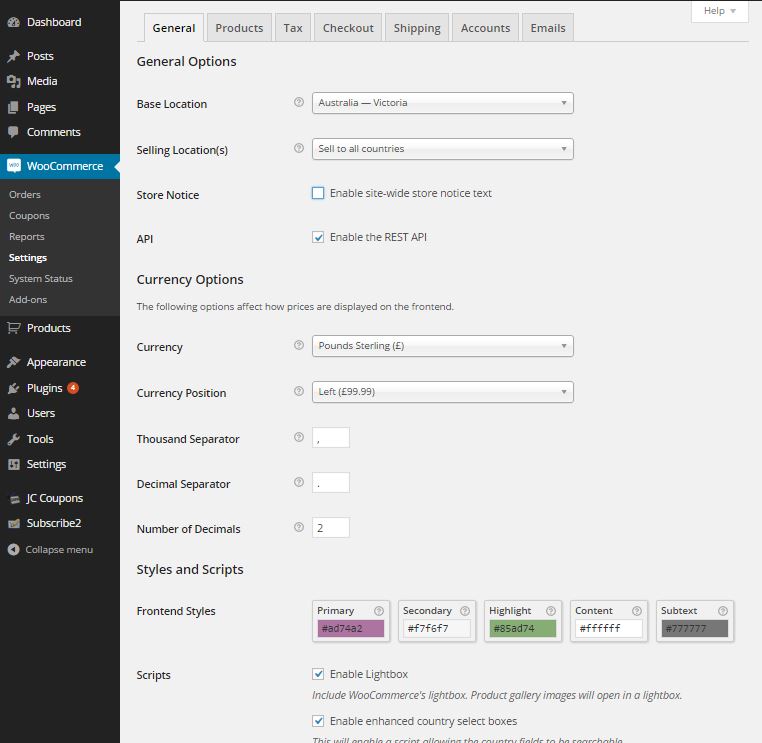
We've selected Australia as our base location and we would like to sell our products in all countries. You should also choose your default currency. Other stuff is not so much important to start with.
Before we go any further make sure to save your changes.
Now we will jump onto next tab - Products
Product Settings
When you click on Products tab you will see this page
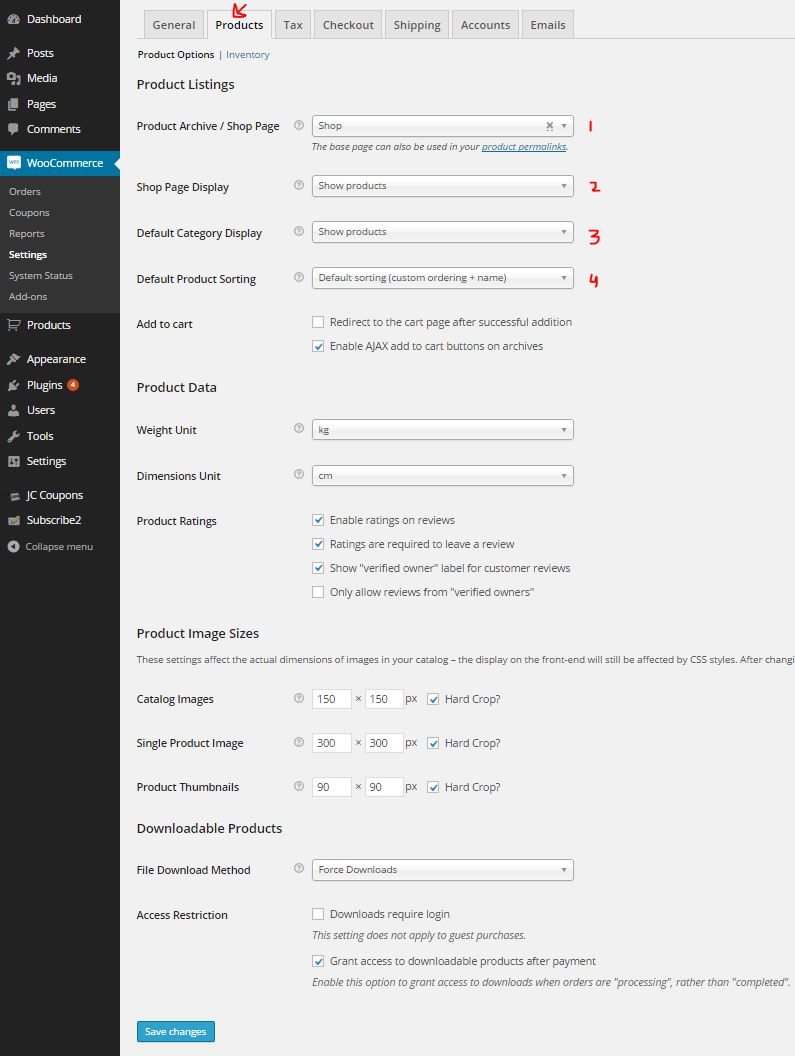
Lets set how our products will be layed on products page, Its about which page to utilize to display certain things and controlling their look to some extent. Lets jump into it.
- Product Archive / Shop Page:
This is out main product page or you can say your products will be listed here. From the drop down list you can choose any but lets go with the page created by WooCommerce and choose Shop, this page will automatically displays your products. You can utilize a new page but then you have to create it and then use it. We see no point in doing that in majority of the cases. - Shop Page Display:
What would you want to display in any of the following. You can choose any of the provided options but if you want to introduce categories then its good that you choose "Show both" option. - Default Category Display:
This is how you would like to diplay when user clicks on specific category. We chose to display products here. You can choose "Show both" if you are utilizing sub categories - Default Product Sorting:
Choose how you want your products to be sortec when display. Popularity by sales if one that we will be using, but then you can leave it to default if you like. - Add to cart
We think this option will be good if remain ticked because you would like a customer to continue to choose product and should not be redirected to cart page on successful addition - Product Data:
Cutomize product related meta information such as what kind of weight or dimensions units you would prefer and the you can also set if you want to enable reviews for your products. - Product Image Sizes
Here you can set width and height of product related images (You will know more on how to create products in next 2 chapters of this tutorial), in most cases default option just work fine. Its a good practice to set this option before you create any product but just in case you want to defer it to see how your product page looks and want to update Image dimensions, you can always come back and update these values. Only catch is that you have to click on "regenerate your thumbnails" and proceed with regenerating images. - Downloadable Products:
You should keep File download method to be default value of "Force download", You should also tick Downloads require login option if you want customer to login before they can download. This helps safeguard link theft.
Once done click on "Save Changes" button ![]()
Product Inventory
Now lets looks at sub tab of products tab called inventory

If your product if based on stock levels then these settings will apply to you. But if you are just going to sell downloadable products then you don't really want to care too much unless there is some sort of licensing issues that are tied to stock levels.
You can change and set things up that suits your needs. We will no go into much details because all options on this page are self explanatory.
Now lets move on to the third tab called Tax
Tax settings with WooCommerce
This settings page have 4 sub settings pages.
- Tax Options
- Standard Rates
- Reduced Rate Rates
- Zero Rate Rates
Lets first check on what Tax options tab shows
First if you want to enable tax handling you should check option "Enable taxes and tax calculations"
After that's done, the main settings you would be interested in are
- Prices Entered With Tax:
Probably its best if you are selling to all countries to select Yes, I will enter prices inclusive of tax but if you targeting customers just in your own country then you can choose to show tax seperately. This will show up during checkout process - Calculate Tax Based On:
WooCommerce can automatically calculate taxes for you based on shipping, base or billing address. You should check with your accountact to which option is best when filling for tax returns. After all you don't want to go bad in tax men's books. - Shipping Tax Class:
If shipping tax if applied then you have to let WooCommerce know how to handle it. You have got few options to choose from.
- Base it on the products being shipped
- Charge a Standard Flat rate or Zero rate
- OR create a new Rate and add it to Additional Tax Classes field
- Additional Tax Classes:
This field is used to add extra tax classes if default classes does not serve your need. WooCommerce will create a new settings screen for each class you add. - Display tax totals:
Specify if you want to show tax for each individual item or as a total during checkout process.
Once you are done making amendments don't forget to click Save Changes before moving onto next step
Lets check a subtab Standard rates or Flat rate based on country
Standard rates
Here is a row we've set up as an example
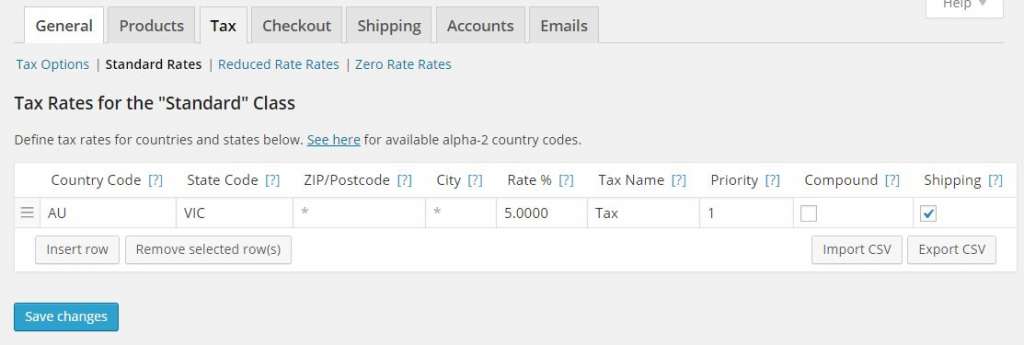
Here you will add rates based on Country, State and City, get the list of country codes by clicking on the "See here" link proviced. Use * as field value for state, postcode and city if you want to apply a standard rate across a country.
In the Shipping field, tick the checkbox if this rate of tax will apply to shipping as well. If this is a compound tax rate then tick that checkbox too. Repeat this for all the entries you want to add by clicking insert Row. Finally Click Save Changes when you are done.
Zero Rate
Some products will have Zero rate of tax applied so based on the country we will add these to our list too
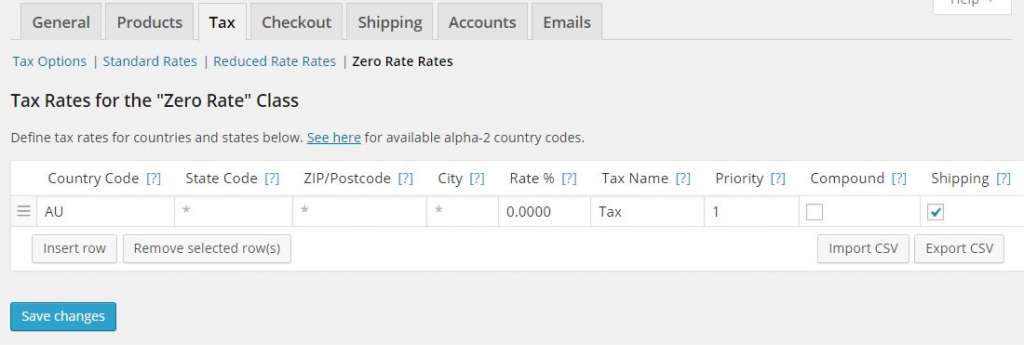
Click save changes when done.
Lets now jump to Checkout settings
Checkout settings
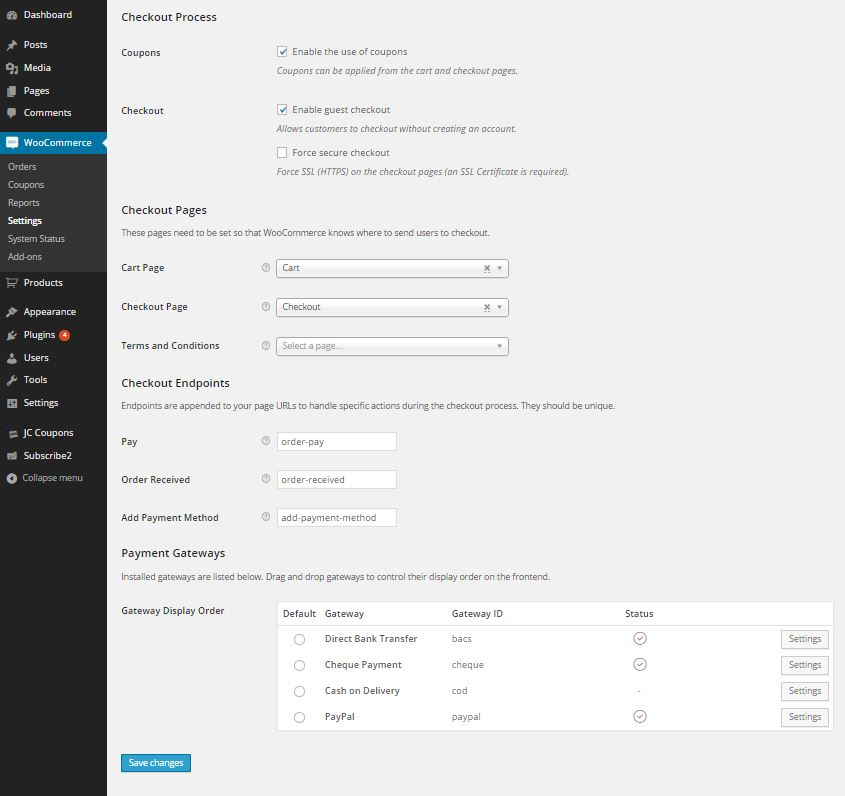
Here you set if you want to allow coupons during checkout process, if you want customers to register before they buy your products (untick Enable guest checkout option), if you have ssl certificate installed and want to launch checkout in secure area, check this option.
In the next section you will choose pages for cart and checkout process. We will use the default ones created by WooCommerce
There are heaps of pages WooCommerce creates during installation but it does not create Terms and Conditions page, If you already have written terms and conditions for your website then you can choose that page from drop down.
You can now choose the order of payment options.
From the Sub Navigation for Checkout settings, Enable each payment methods you are interested in.

You have to provide details BACS (direct bank/wire transfer) and should add Paypal email and other relavent details if you are going to accept Paypal. Also please note that there are other payment methods you can install, check out WooCommerce commercial extensions and see if Payment Processor you are interested in is listed as an extension there.
Shipping Settings
WooCommerce provides different shipping options. What this means is that you are able to charge shipping using a flat rate or based on the products you're going to ship. You can again browse WooCommerce extensions to see if more advanced shipping methods can be installed. e.g. to charge shipping by weight etc you will need extension Table rate shipping here is the link http://www.woothemes.com/products/table-rate-shipping-2/
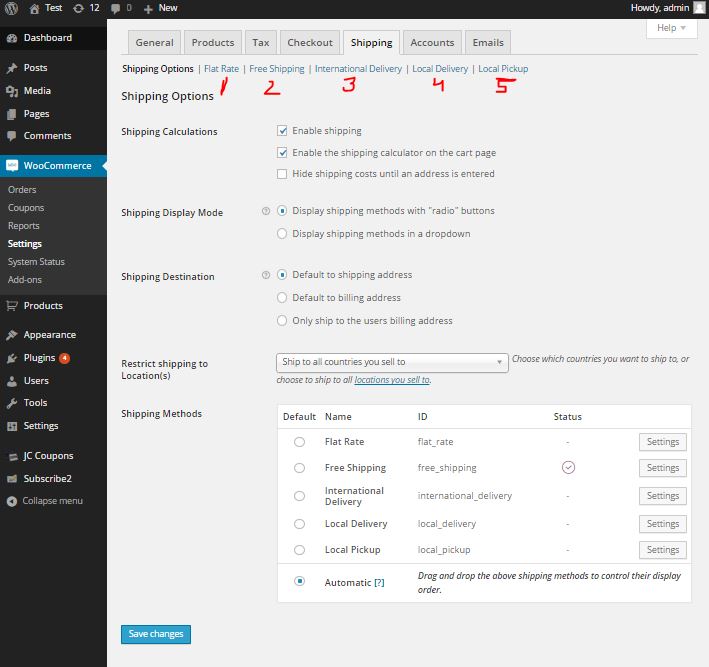
You will need to activate or enable shipping methods your website store will be using. You have 5 options by default
- Flat shipping
- Update title if needed
- Add Countries you would be shipping to
- Choose if tax is applicable on shipping or not
- Any cost associated with order.
- Any additional rates. This means that you will charge x number of dollars on Flat rate because of N reasons
- Add if there are any additional costs per order or per item or per class of items
- If there is any object handling fees you can add that too.
- Free shipping
- No real configuration except if you want to associate free shipping with
- Coupon
- Minimum x dollars spent
- Coupon or Minimum x dollars spent
- Coupon and Minimum x dollars spent
- No real configuration except if you want to associate free shipping with
Likewise adjust other shipping deliver settings for
- International shipping
- Local delivery - If your shop is local only, works for Pizza shops etc
- Local pickup - Works well for local only shops
When you make any change don't forget to "Save" your changes by clicking "Save Changes" button
Account settings
Accounts associated with WooCommerce, here you can control page slugs and designate account page if using non WooCommerce created page. We will leave default options on this page
Choose other settings as per your liking. We would leave the default one checked.
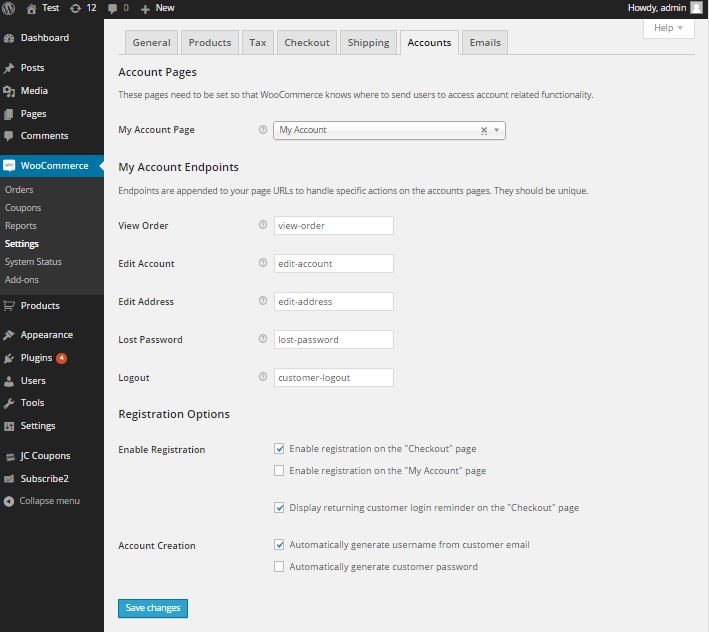
Once done click "Save changes" button
Emails Settings
WooCommerce will send you an email when someone place a new order on your website. This is handy set of functionality just in case you want to take any manual action. Email options settings page give you option to set header and footer option for your email and also from name and from email address. You can have your generic sales@... set here.
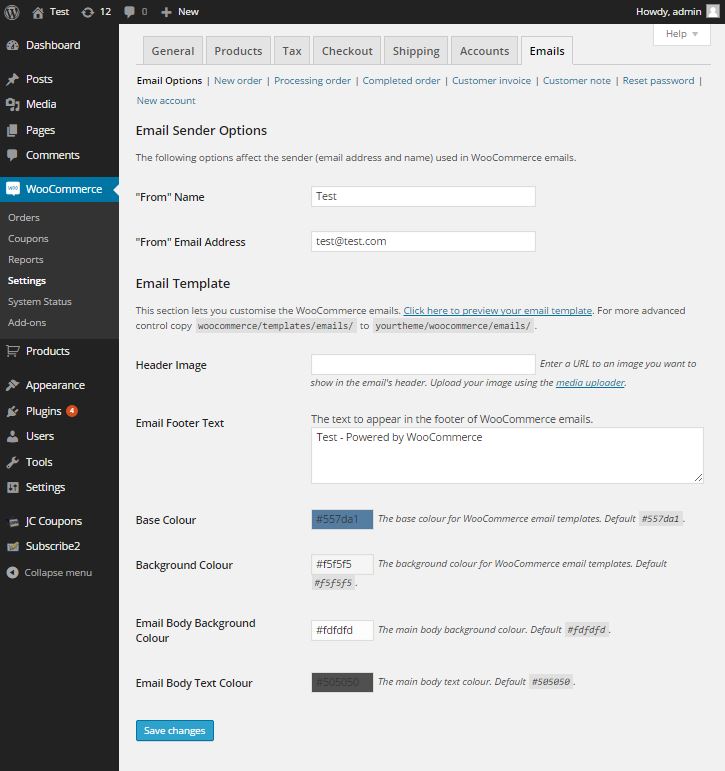
You can now adjust different other email settings
- New order: WooCommerce will send an email to all recipients listed in recipients field, Amend the title if required.
- Processing order: This is an order notification sent to the customer after payment containing order details. You can update the HTML template if you like but that need to be done by someone technical.
- Completed order: An email is sent to the customer when order status is updated to Completed. Override any default text you would like to. We recommend to keep this option enabled, that's how it is by default.
- Customer invoice: Customer invoice emails are sent to the user containing order information and payment links.
- Customer note: If there is any sort of delays or you just want to address an issue, you can add note to an order and customer will get an email regarding this update
- Reset password: Email will be sent when customer resets their password.
- New account: A welcome email will be sent to customers when new account is created.
Before we jump onto adding products its a good idea to get yourself familiar with other pages under WooCommerce menu.
- Orders: When you start receiving orders, this is the place where you can find them, add notes, manage order statuses etc
- Reports: You are able to generate sales reports at your will.
- System Status: See if there are any issues with your store.
- Add-ons: This is where you will get links to WooCommerce extensions, you are able to choose extensions by category or ones that are popular.
This is it for the settings and other relevant pages for WooCommerce. In next chapter we will see how we can add physical products to our store.
Description
You are running a Wordpress blog and all of a sudden you want to sell few things through your blog. You ask yourself what plugin should I go for to start selling immediately. How much would it cost and so on.
We are going to show you a plugin called WooCommerce which could just be right for you and in this turorial we will cover a few topics in chapters below
- Installing WooCommerce
- Setting up WooCommerce
- Creating Physical Products
- Creating Virtual and downloadable products using WooCommerce
- Alternatives
You can also take a Quiz to test your knowledge on WooCommerce
Environment
Wordpress 4+
Prerequisites
Understanding on using Wordpress Admin panel.
Audience
If you want to set up a quick shop through your WordPress blog this tutorial is for you.
Author: Subject Coach
Added on: 8th Dec 2014
You must be logged in as Student to ask a Question.
None just yet!