A complete Idiot's guide to get started with WooCommerce
Chapters
Setting up for products and adding Physical Products with WooCommerce
In previous chapter we learned how we can install and setup WooCommerce.
In this chapter we will learn how to setup product categories, tags, attributes and shipping class, then we will add a physical product to our store
WooCommerce menu looks like this
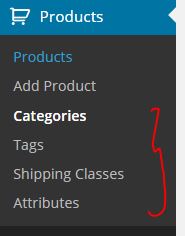
- Products: Lists all the configured products for you shop
- Add Product: Add new products to your store
- Categories: WooCommerce product categories. This has nothing to do with your blog categories
- Tags This is where we will configure product tags
- Shipping Classes We will add our shipping classes here
- Attributes If you have heard about taxonomies. Attributes works quite similar
We will introduce you to Categories, Tags, Shipping classes and Attributes and then will add one physical product
To start with, let's add Categories for our store. We will use two example categories as
- Monitors - an example for physical product
- Software - an example for virtual product
Goto Products > Categories to create your store's first product category:
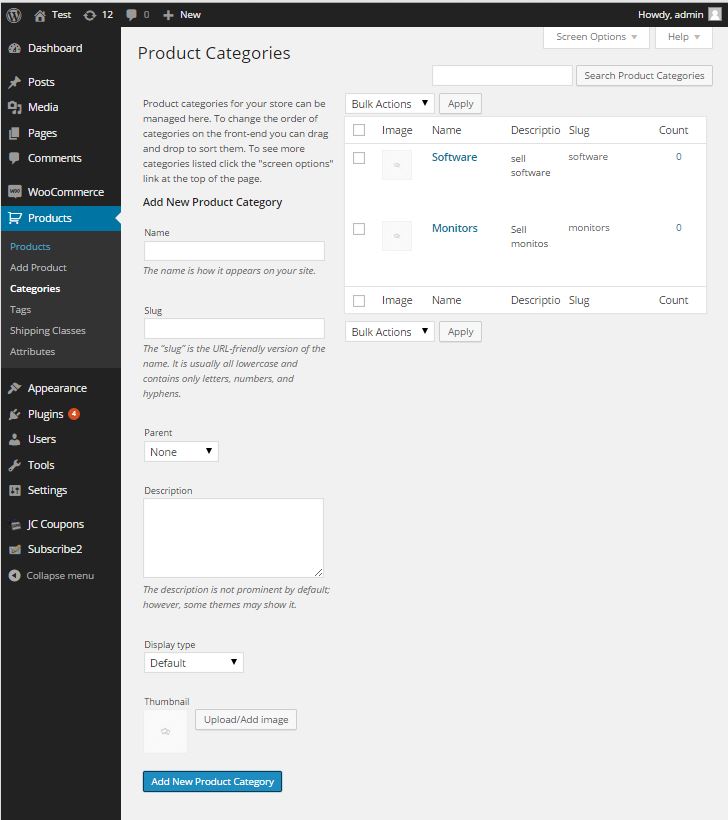
One thing you should keep in mind is that as with normal blog categories, You are also able to add a category when you are configuring your products.
Lets now move on to product tags
Configuring Product Tags with WooCommerce
Product tags are not same as Posts > tags they work in a different way and are only linked to WooCommerce products.
Configure your tags to go with your product.
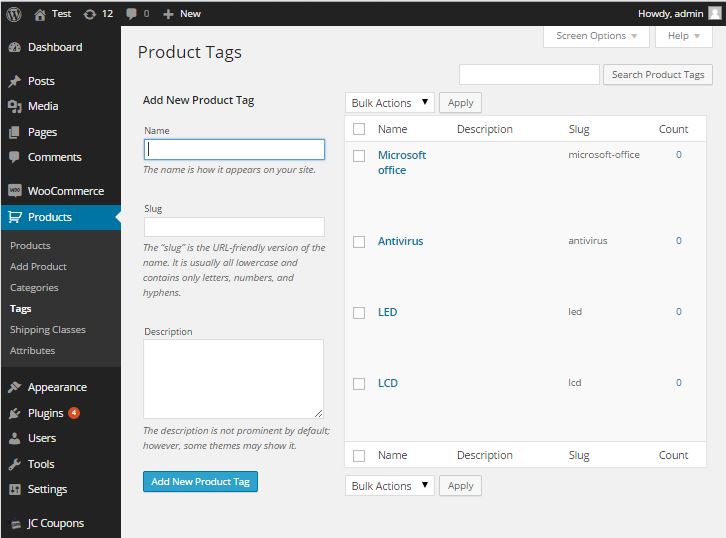
Create a list of tags. Tags provide a useful way to group related products.
Adding Shipping Classes
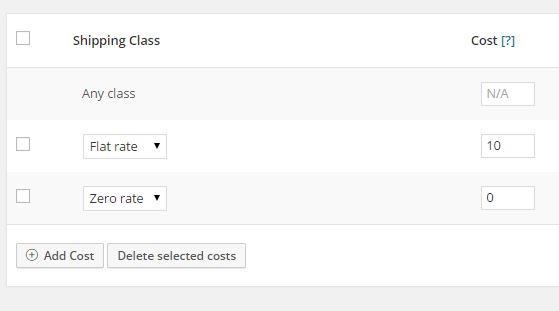
This is where you group your products with shipping classes. We touch based on configuring shipping methods in previous chapter. If you haven't read that then you may want to have a read. We will add a shipping classes for our shop with Flat rate and Zero rate.
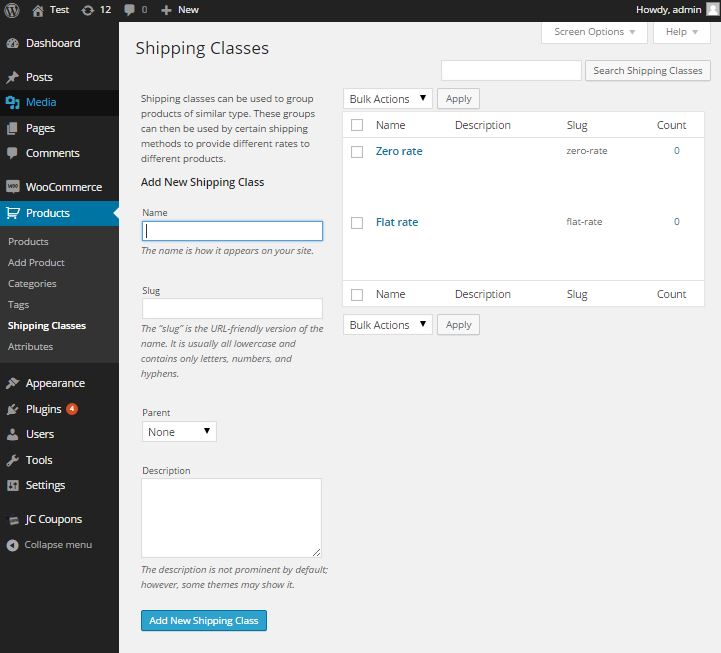
You will need to enable and define costs for each class that you will be using. Goto WooCommerce > Settings > Shipping and then adjust/enter details for Zero Rate and Flat rate. For Flat rate add costs under costs section. You will notice that when you add cost entry above 2 entries will be displayed in shipping class column. Zero rate here means $0 shipping cost and should not be confused with Tax rates.
We've added 2 entries here
Lets jump to adding attributes
Adding WooCommerce Attributes
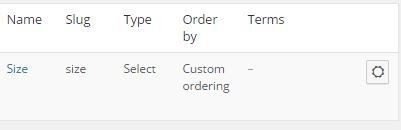
Attributes work like taxonomies. In WooCommerce, a "taxonomy" is a grouping mechanism for some products. The names for the different groupings in a taxonomy are called terms. As we will have add terms to each attribute we create.
We added an attribute called Size and we will work to add terms to this attribute. Each term under Size will work as a category
Type field is important
- Text You are offered flexibility by manually typing attribute's term. This however may lead to near duplicate entries. Generally we prefer the second and default option called Select
- Select promises accuracy because users will only be able to select terms for a given attribute from a predefined list in a drop down box.
Clicking on that little button in the last column of Attributes table takes you to adding terms for our attribute
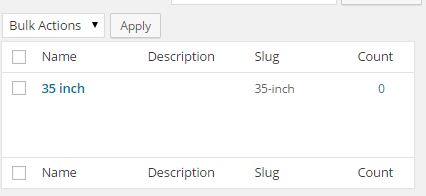
I have defined a new term called 35 inch for attribute Size
Now lets jump to adding a physical product
WooCommerce Add Physical product
Our shop will be selling some monitor and some software. Monitor is our physical product so lets add that so that we can quickly start selling.
Goto Products > Add product
We will add product image, title, description, category and select property tags from already configured tags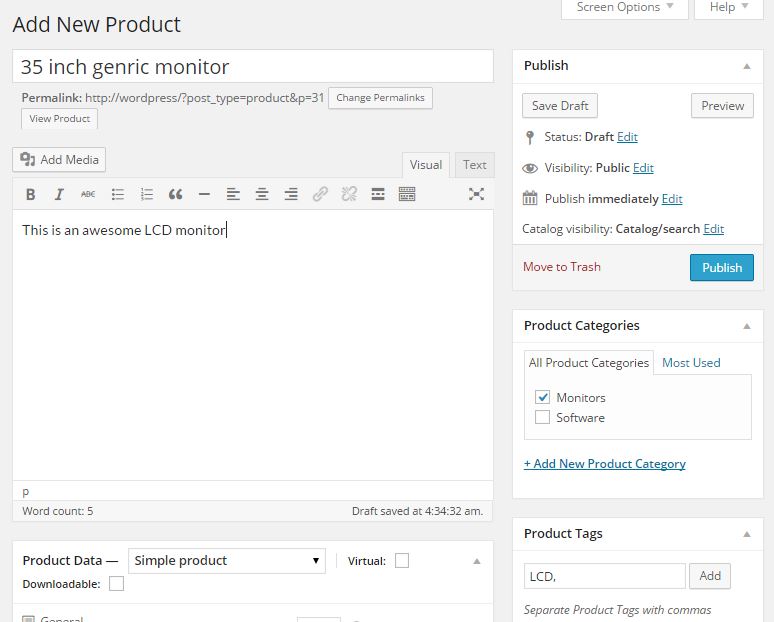
Click Publish. We will get to other stuff in a bit. Once we publish this product goto your Shop page. You will start getting a feel on what's going on.
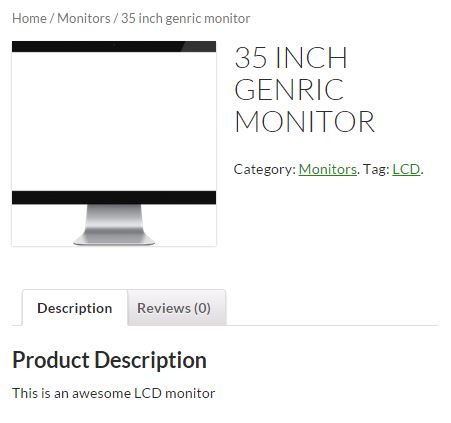
Interesting things from above shot are that
- Our category is included at the top
- Our product image is cropped as per our settings under Products tab
- Our tag is displaying correctly.
At this stage as you see that there is no Add to cart buttons, thats because we did not have any other info added to this product. Let do that now and configure Product data
Product Type can be one of the following
- Simple product is just a basic product
- Grouped product is a collection of products to create variations. e.g. my monitor can be sold with and without cables.
- External/affiliate product these are external products and used for making commision and are not sold through you.
- Variable product can have multiple variations for a product such as color etc. e.g. Our monitor can be sold in black or silver colors
In General settings for your product, you will give a unique SKU (Stock keeping unit) ID to your product and will enter regular price for your product, if you want to put this product on sale then put sale amount. You can also schedule a sale
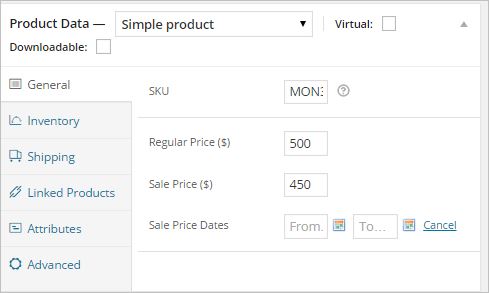
this view will change depending on which country or region you chose.
Remember not to check Virtual checkbox else this product will no longer require shipping stuff.
Moving to next tab "Inventory", You can enable inventory. Here is an example how we set up Inventory for our Monitor product
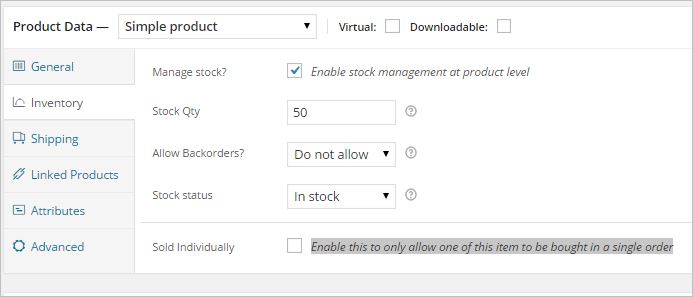
Above settings are self explanatory but if you feel a bit lost then hover on those question mark and a help tip will be displayed.
Moving to next tab "Shipping", this is how we setup our shipping stuff for our product
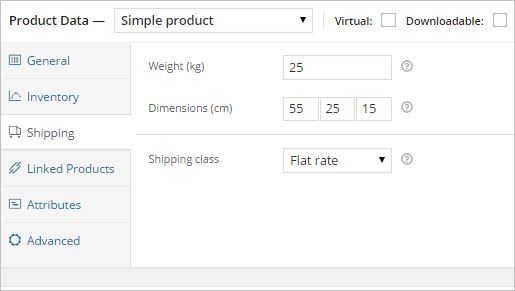
Remember that shipping class is something we setup just before.
Lets move on to next tab "Linked Products"
We are creating our first product at this stage but Idea is to make you can up-sell or cross-sell your products. So We've created another product called Monitor cover to save it from dust.
Here is how it looks. Using up-sells and cross-sells you are able to promote your products with one another. Start typing a particular product, once displayed in the list, select the product from the drop down list. You can add as many as you wish.
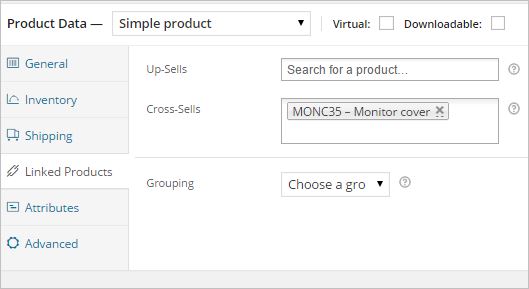
Up-sells are products displayed on product page under "You may also like" section. Cross-sells are products which are displayed at the cart and related to the users cart contents. Grouping Set this option to make this product part of a grouped product.
Attributes tab
On the attributes tab you can assign attributes to the product we are creating. Depending on how you've configured your attributes and terms you will see all global attribute names in a drop down list.
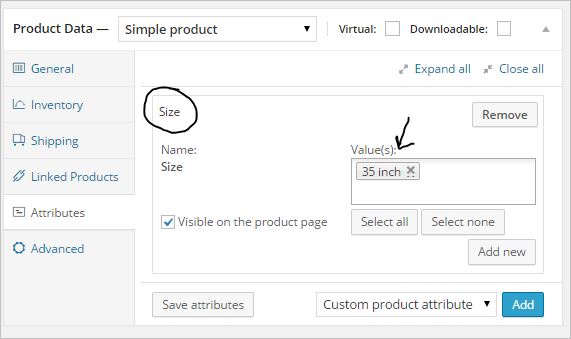
As you can see we have selected size attribute and selected 35 inch as term. You are able to add a new attribute if you like from this screen. Don't forget to click "Save attribute" to save your progress on attributes
Advanced tab
- Purchase note – If you want to add an optional note
- Menu order – Custom ordering position for this item.
- Enable Reviews – Enable/Disable customers reviews for this product from customers
Update your product by clicking update button. This is how product will look.
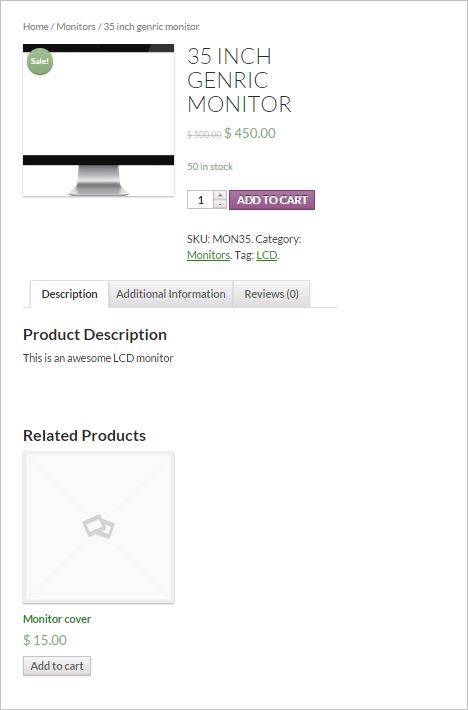
Works pretty well. eh! See that related produts section. This is result of upsell product we chose above and during the checkout process
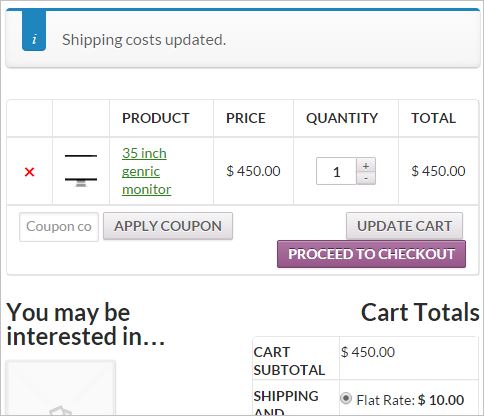
We are cross selling the same product too during checkout phase.
You are also able to make this product a featured product by click on catalog search visibility edit link as shown below
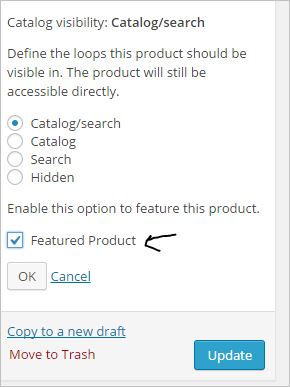
As from above setting you can also see that We can control where our product could show up.
Lets quickly check how we can add affiliate products
Adding Affiliate Products
Click Products > Add product
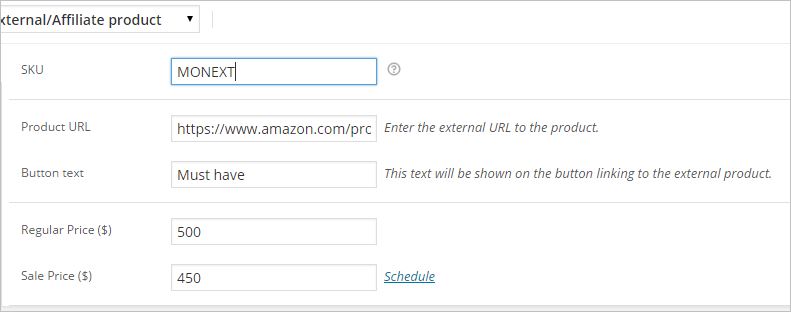
Select product type as "External/Affiliate product"
you can use your store to sell products which are not dispatched by you but rather sold by thrid part solutions such as Amazon, FlipKart etc. You could end up generating some commission for yourself after every affiliate sale.
Shipping does not apply to Affiliate products. Under general setting provide a link to affiliate product as shown below. Customer will be take to another third part website hosting either your or someone else's product
We hope that much of what we have discussed made sense to you.
In next chapter we will learn how to add virtual products.
Description
You are running a Wordpress blog and all of a sudden you want to sell few things through your blog. You ask yourself what plugin should I go for to start selling immediately. How much would it cost and so on.
We are going to show you a plugin called WooCommerce which could just be right for you and in this turorial we will cover a few topics in chapters below
- Installing WooCommerce
- Setting up WooCommerce
- Creating Physical Products
- Creating Virtual and downloadable products using WooCommerce
- Alternatives
You can also take a Quiz to test your knowledge on WooCommerce
Environment
Wordpress 4+
Prerequisites
Understanding on using Wordpress Admin panel.
Audience
If you want to set up a quick shop through your WordPress blog this tutorial is for you.
Author: Subject Coach
Added on: 8th Dec 2014
You must be logged in as Student to ask a Question.
None just yet!